Saturday, 1 October 2016

Calculate Real Time Percentiles On Streamed Data

When monitoring the operational performance of a sub system or component one can use the PerformanceCounter classes to define a custom counter. The PerformanceCounter classes can create counters that can measure rates, averages, percentages, differences or instantaneous values.These counter types cover a broad range of measurement use cases.

One of the common features of these performance counter types is that they are single values computed at an instance of time. Without recording successive value and aggregating the results they cannot provide any indication of the distribution of the values measured.

Often when monitoring the operational performance of a subsystem it is extremely useful to determine the values of the high order percentiles e.g. 90th, 95th, 99th. One of the difficulties in determining the values for these percentiles on a operational system that produces a continuous stream of metric values, for example response time, is the storage requirements for the sample data.

There are a number of algorithms that have been proposed that can compute percentile values on a stream of data values utilising a limited of fixed amount of storage space. After some investigation I decided to implement the P2 algorithm (P squared algorithm).

It is beyond the scope of this post to discuss the P2 algorithm in detail. It is however worth outlining some of the pros and cons of P2 algorithm.

Pros

  • The amount of memory per percentile value calculated is fixed
  • The execution time for calculating a given percentile when a new observation is added is linear

Cons

  • The algorithm does not store the observations there for it performs an estimation of a given percentile. The estimate will deviate from the actual value. The P2 does not have an upper bound for this error. In practical terms the deviation is not that significant as will be shown later in this post

P2 Implementation

To use the PSquared  type to calculate a number of percentiles an instance is constructed passing a list of percentiles expressed as values in the range of 0 – 1.

var pSquared = new PSquared(new List<double> {0d, 0.1d, 0.2d, 0.3, 0.4, 0.5, 0.6, 0.7, 0.8, 0.9, 1});

As samples of data are generated or measured they are added to the instance

pSquared.AddSample(d);

To calculate a given percentile value call the Result method passing the percentile to calculate

var percentile = pSquared.Result(0.9);

P2 Performance

Using test data generated with R using the following functions x <-runif(200), quantile(x). This produced test data and expected quantiles values to compare against those generated by the P2 implementation.

Expected Actual % Error
0.002780183 0.00471922292652855 -37.7260207657616
0.250419949 0.247412034395431 0.803984453455285
0.515937582 0.508948571191173 0.90717849799471
0.757101159 0.747366391997607 0.860886247617353
0.996617917 0.992925258643177 0.2473180945208

As can be seen from the results that the error in all percentile is less than 1%. When the execution time is measured per call to the AddSample() method the average execution time is 1 us.

The code is available here: GitHub Statistics

Wednesday, 28 September 2016

Interoperability between Nanopb and googles Protocol Buffers

As part of a project to build an AVR controlled toaster oven reflow controller I decided to use Googles Protocol Buffers and Nanopb to serialise the command and control data between the .net pc software and the atmega32u2 based control board. The details of the toaster oven reflow controller will be covered in a separate blog entry.
There are where a number of compatibility issues between the two libraries that I found workarounds for. I didn't find a huge amount of information about this topic on line so I decided to share what I found.

Version Compatibility

The first issue is one of Protocol Buffers and Nanopb protocol version compatibility. Nanopb only supports version 2, proto2 definitions, and the current .net Google.Protobuf only supports version 3, proto3 definitions.
For nanopb a message must be defined as follows:
syntax = "proto2";

message Request {

    enum RequestType {
        REQUESTONE = 0;
        REQUESTTWO = 1;
    }

    required RequestType Command = 1;
}
For Google Protocol Buffers the corresponding message must be defined as follows:
syntax = "proto3";

message Request {

    enum RequestType {
       REQUESTONE = 0;
       REQUESTTWO = 1;
    }

    RequestType Command = 1;
}
The version 3.0.0 release of Google Protocol Buffers proto2 is not supported, the required keyword has been deprecated as it not supported in proto3.

Stack space and error strings

Nanopb is designed to run on memory constrained devices. The atmega32u2 device has 1024 bytes of SRAM available for stack and heap storage. I discovered during the course of testing the controller that the code on the atmega32u2 device could not decode messages that contained more than 3 or 4 fields. Using the debugger I determined that this was due to stack overrun. Luckily the only side effect as there was not a huge amount of free SRAM memory available on the device. Looking at the memory usage of the Nanopb code I could see that there is some overhead in the definition of the fields for a message. Each field defined consumes 10 bytes of SRAM for the number of fields defined in the messages that was 240 bytes.

When the atmega32u2 code is complied the static analysis of the compiler indicates the following:

Program Memory Usage     :    17732 bytes   54.1 % Full
Data Memory Usage         :    747 bytes   72.9 % Full

Looking through the code for Nanopb I noticed that the error strings in the stream methods where not loaded from flash memory. Which is default behaviour in AVR code unless steps are taken to instruct the compiler, using the PROGMEM macro to locate the literal string constants in flash.

PB_RETURN_ERROR(stream, "end-of-stream");

Launching the debugger and browsing through the IRAM of the device shows the strings taking up memory.

image
Nanopb does support turning off error messages by using a compiler flag PB_NO_ERRMSG. Defining this flag for the build results in the following:

Program Memory Usage     :    16248 bytes   49.6 % Full
Data Memory Usage         :    377 bytes   36.8 % Full

Basically a small, ~5% reduction in flash memory but a 50% reduction in SRAM usage.

Wednesday, 28 October 2015

SAMA5D3 Xplained .Net Micro Framework Port

I have been working on a port of the .net micro framework for the SAMA5D3 Xplained board for the last few months on and off as I have had the time. The port is based on the 4.4 code of the recent .Net Micro Framework release.

I have now reached the first milestone I have a partially functioning PortBooter. It initialises the hardware and loads the PortBooterDecompressor into SRAM. The PortBooterDecompressor then proceeds to load the PortBooter application into DRAM and jumps to the BootEntry entry point.

image

The next pieces of work required are to implement the flash and storage drivers. Build the PortBooterClient and test its interaction with the PortBooter.

Later I will develop the additional drivers for the other hardware devices such as USB, I2C, SPI etc. There is still some way to go but I think I have gotten over the first hurdle.

At some point in the future I may simplify the boot process as the decompressed boot loader is not necessary as the PortBooter should fit in the SRAM section of the SAMA5D3 device.

Tuesday, 7 April 2015

Who is ELMO GMAS

I recently purchased an ATMEL SAMA5D3 Xplained board play around with developing some bare metal ARM code and possibly at some point in the future when I learn a bit more port the .net micro framework to this board. Also this board can run a few different flavours of embedded Linux and is supported by the GCC compiler.

One of the first issues that I came across is when I connected this board was that it is detected as an ELMO GMAS device.

image

From a quick search I found very little info on why the board was detected as an ELMO GMAS device. Being unsure if this incorrect detection would cause problems with some of the flash tools I set about fixing the problem.

First step is to install the latest SAM-BA tool from ATMEL. This contains the correct driver definition for the board.

  • Right click on the ELMO GMAS device and click update driver
  • Select Browse my computer for driver software

image

  • Select Let me pick from a list of device drivers on my computer

image

  • Click have disk

image

  • Browse to the driver folder of SAM-BA

image

  • Click ok then click next

image

  • A warning will be displayed, click ok as we are sure that this is the correct driver

image

  • The driver will be installed and the device will show up as an AT91 USB to Serial converter

image

When the board is booted up in BootROM mode i.e. the JP5 jumper is removed you may have to install a driver for the device. The same AT91 driver can be used

Sunday, 1 June 2014

Part2: Creating a SAML 2.0 Token using WIF 4.5

In Part 1 I demonstrated how to generate a simple SAML2 token using the WIF 4.5 libraries. To finish this out I will now describe how to read a SAML2 token that was previously generated with the SamlTokenProcessor class.

Read Token

In order to read an encrypted and signed SAML2 token an instance of a SecurityTokenHandler class is required that has the correct configuration. Specifically we need an instance of an Saml2SecurityTokenHandler class. It is possible to create an instance of this class and configure it through code, an alternate approach is to use the WIF configuration classes to configure and create an instance of a Saml2SecurityTokenHandler. This is a preferred approach because it provides some level of flexibility to the SamlTokenProcessor. Below is an example of how to create the Saml2SecurityTokenHandler from the IdentityConfiguration.
IdentityConfiguration configuration = new IdentityConfiguration();

_saml2SecurityTokenHandler = configuration.SecurityTokenHandlers[typeof(Saml2SecurityToken)];

_saml2SecurityTokenHandler.Configuration.ServiceTokenResolver = 
 new X509CertificateStoreTokenResolver(StoreName.My, StoreLocation.CurrentUser);

The Saml2SecurityTokenHandler instance requires a security token resolver. This is a class that is able to resolve the signing and encrypting certificates that where originally used to create the SAML2 token. The IdentityConfiguration class expects a configuration section in the application configuration file.
<configSections>
    <section name="system.identityModel" type="System.IdentityModel.Configuration.SystemIdentityModelSection, System.IdentityModel, Version=4.0.0.0, Culture=neutral, PublicKeyToken=B77A5C561934E089" />
  </configSections>

The configuration required for the example application is as follows, this configuration is a basic configuration which is used for token validation, more on this later. The configuration can be used to configure replay detection for tokens or the maximum clock skew between the token generator and the token consumer.
<system.identityModel>
 <identityConfiguration>
  <audienceUris>
   <add value="http://rp.com/" />
  </audienceUris>
  <issuerNameRegistry type="System.IdentityModel.Tokens.ConfigurationBasedIssuerNameRegistry, System.IdentityModel, Version=4.0.0.0, Culture=neutral, PublicKeyToken=b77a5c561934e089">
   <trustedIssuers>
    <add thumbprint="‎0D274A03BDCA95015E712E2808F917C93159ED1B"/>
   </trustedIssuers>
  </issuerNameRegistry>
 </identityConfiguration>
</system.identityModel>

Note: The thumbprint element value must be set to the thumbprint of the STS identity certificate that was generated or acquired from a CA. Also be careful copy and pasting the thumbprint as it can copy with BOM data in the string.

Now that we have an instance of a Saml2SecurityTokenHandler it can be used to read a token from a stream.
public SecurityToken ReadSecurityToken(Stream stream)
{
 SecurityToken securityToken;

 using(XmlReader rdr = new XmlTextReader(stream))
 {
  securityToken = _saml2SecurityTokenHandler.ReadToken(rdr);
 }

 return securityToken;
}

Validate Token


The VerifySecurityToken method of the SamlTokenProcessor class can verify a SAML2 token against the configuration specified in the configuration file. A prerequisite to verifying the SAML2 token generated is to ensure that the signing token is present in the certificate store under TrustedPeople.

image

The VerifySecurityToken method will verify the attributes of the token against the configuration. As a test the audienceUri can be modified to cause the  verification to fail.
<audienceUris>
 <add value="http://rp2.com/" />
</audienceUris>
When the test application is run using this configuration an AudienceUriValidationFailedException exception will be thrown.
 
System.IdentityModel.Tokens.AudienceUriValidationFailedException: ID1038: The AudienceRestrictionCondition was not valid because the specified Audience is not present in AudienceUris.
Audience: 'http://rp.com/'
   at System.IdentityModel.Tokens.Saml2SecurityTokenHandler.ValidateToken(SecurityToken token)
   at CoreMemoryDump.Saml.SamlTokenProcessor.VerifySecurityToken(SecurityToken securityToken) in c:\Users\Office\Documents\Visual Studio 2012\Projects\CoreMemoryDump.Saml\CoreMemoryDump.Saml\SamlToken
Processor.cs:line 92
   at CoreMemoryDump.SamlTest.Program.Main(String[] args) in c:\Users\Office\Documents\Visual Studio 2012\Projects\CoreMemoryDump.Saml\CoreMemoryDump.SamlTest\Program.cs:line 47

Similarly modifying the TrustedIssuers list will elicit an exception indicating that the issuer is not trusted.

Summary


The intent of this example code was to show that it is possible to generate, read and verify a SAML token using the base libraries from the WIF 4.5 framework. This example provides a basic implementation that can be extended to enable greater flexibility for generating SAML tokens.  


The code is available here: GitHub DumpingCoreMemory.Saml

Thursday, 1 May 2014

Part1: Creating a SAML 2.0 Token using WIF 4.5

To create a SAML token we will need a set of certificates for the Relying Party (RP) and Secure Token Service (STS). These certificates plus keys will be used for the signing and encryption of the SAML 2.0 token. In the  part 2 of this series the keys will be used for signature verification and decryption.
First we need a certificate for the certificate authority that will be used as the issuer for the STS and Relying Party. Note you will be prompted for a password for the CA private key file, use a simple password as you will be prompted for this password when creating the certificates for the RP.
makecert -n "CN=RootCATest" -r -sv RootCATest.pvk RootCATest.cer
To create the certificate for the STS and Relying Party the following command can be executed from a batch file.
makecert -sk %1 -iv RootCATest.pvk -n CN=%1 -ic RootCATest.cer –sr localmachine -ss my -sky exchange -pe %1.cer
For example createcert.bat RP will create the certificate for the RP. Note that all of the certificate creation commands must be executed from a VS2012/2010 command prompt that is running with administrator privileges.
Later we will place the certificates in the relevant certificate stores for use later in the process of developing the SAML token generator.

Token Generation

To generate a SAML token a SecurityTokenDescriptor must be created. This is a place holder for the attributes of an issued token.
private SecurityTokenDescriptor BuildBaseSecurityTokenDescriptor(Uri appliesToAddress, String issuer, TimeSpan validityPeriod, 
            IEnumerable<Claim> claims, X509Certificate2 encryptingCertificate, X509Certificate2 signingCertificate)
{
  DateTime utcNow = DateTime.UtcNow;
  SecurityTokenDescriptor securityTokenDescriptor = new SecurityTokenDescriptor();
  securityTokenDescriptor.AppliesToAddress = appliesToAddress.ToString();
  securityTokenDescriptor.TokenIssuerName = issuer;
  securityTokenDescriptor.Lifetime = new Lifetime(utcNow, utcNow.Add(validityPeriod));
  securityTokenDescriptor.SigningCredentials = new X509SigningCredentials(signingCertificate);
  securityTokenDescriptor.Subject = new ClaimsIdentity(claims);
  securityTokenDescriptor.TokenType = "http://docs.oasis-open.org/wss/oasis-wss-saml-token-profile-1.1#SAMLV2.0";
  securityTokenDescriptor.EncryptingCredentials = new EncryptedKeyEncryptingCredentials(encryptingCertificate);

  return securityTokenDescriptor;
}

To generate the token a SecurityTokenHandlerCollection is constructed with a collection of SecurityToken handlers. To generate a SAML token we use a Saml2SecurityTokenHandler, to generate the Saml2 token and a EncryptedSecurityTokenHandler to encrypt and sign the token when the token is serialized.
public SamlTokenProcessor()
{
  _securityTokenHandlerCollection = new SecurityTokenHandlerCollection();
  _securityTokenHandlerCollection.Add(new Saml2SecurityTokenHandler());
  _securityTokenHandlerCollection.Add(new EncryptedSecurityTokenHandler());
}

Calling the CreateSecurityToken method generates a Saml2SecurityToken instance.
SamlTokenProcessor processor = new SamlTokenProcessor();

X509Certificate2 encryptingCertificate = CertificateResolver.ResolveCertificate(StoreLocation.LocalMachine, StoreName.My, "CN=RP");
X509Certificate2 signingCertificate = CertificateResolver.ResolveCertificate(StoreLocation.LocalMachine, StoreName.My, "CN=STS");

List<Claim> claims = new List<Claim>() { new Claim("Claim", "Value") };

SecurityToken token = processor.CreateSecurityToken(new Uri("http://rp.com"), "sts", new TimeSpan(0, 0, 10), claims, 
 encryptingCertificate, signingCertificate);

using(Stream stream = new FileStream("token.xml", FileMode.OpenOrCreate))
{
 processor.SerializeSecurityToken(token, stream);
}

The SerializeSecurityToken method serializes the token to a stream. This applies the signing and encryption to the resultant tokens XML representation. Below is an example token shortenedshortend for brevity.
<?xml version="1.0" encoding="utf-8"?>
<EncryptedAssertion xmlns="urn:oasis:names:tc:SAML:2.0:assertion">
  <xenc:EncryptedData Type="http://www.w3.org/2001/04/xmlenc#Element" xmlns:xenc="http://www.w3.org/2001/04/xmlenc#">
    <xenc:EncryptionMethod Algorithm="http://www.w3.org/2001/04/xmlenc#aes256-cbc" />
    <KeyInfo xmlns="http://www.w3.org/2000/09/xmldsig#">
      <e:EncryptedKey xmlns:e="http://www.w3.org/2001/04/xmlenc#">
        <e:EncryptionMethod Algorithm="http://www.w3.org/2001/04/xmlenc#rsa-oaep-mgf1p">
          <DigestMethod Algorithm="http://www.w3.org/2000/09/xmldsig#sha1" />
        </e:EncryptionMethod>
        <KeyInfo>
          <o:SecurityTokenReference xmlns:o="http://docs.oasis-open.org/wss/2004/01/oasis-200401-wss-wssecurity-secext-1.0.xsd">
            <X509Data>
              <X509IssuerSerial>
                <X509IssuerName>CN=RootCATest</X509IssuerName>
                <X509SerialNumber>78425684050690387325969986111748521388</X509SerialNumber>
              </X509IssuerSerial>
            </X509Data>
          </o:SecurityTokenReference>
        </KeyInfo>
        <e:CipherData>
          <e:CipherValue>NSmOOCR6CzGCj+lY2PF....</e:CipherValue>
        </e:CipherData>
      </e:EncryptedKey>
    </KeyInfo>
    <xenc:CipherData>
      <xenc:CipherValue>e5kGcfcel/YN+Qjz....</xenc:CipherValue>
    </xenc:CipherData>
  </xenc:EncryptedData>
</EncryptedAssertion>

In the second part of this two part blog I will demonstrate how to reverse the process and extract the claims from the encrypted SAML2 token.

The code is available here: GitHub DumpingCoreMemory.Saml

Tuesday, 1 April 2014

Creating and Consuming SAML 2.0 Tokens using WIF

With the introduction of Windows Identity Foundation 4.5 Microsoft removed the Visual Studio templates that could be used to generate a custom WCF STS service. The custom STS could then be used to issue SAML 2.0 tokens based on custom credentials passed with the WS-Trust request to the custom STS.

The underlying classes are still available to use for creating a custom STS, without the templates available it is still possible to create a custom WCF STS service but it requires a bit more effort.

There is however an alternate means to generate SAML 2.0 tokens using WIF that forgoes the need to create a custom STS. This is useful in scenarios involving proprietary systems that have custom protocols and authentication, that also do not lend themselves well to integration with ADFS etc.

To explain how this can be achieved I will break the problem down into two parts:

Part 1: Creating a SAML 2.0 Token using WIF 4.5

Part2: Consuming a SAML 2.0 Token using WIF 4.5

Saturday, 22 March 2014

mfNordic library released on Codeplex

As part of the development effort for the home monitoring system I implemented a .net micro framework library for interfacing to a Nordic semiconductor NRF24L01P radio module. I have released the source code on https://mfnordic.codeplex.com/ under the MS-PL license.

Using the library

var radio = new Nrf24L01P(SPI_Devices.SPI1, Pins.GPIO_PIN_D0, Pins.GPIO_PIN_D1, Pins.GPIO_PIN_D2);

The Nrf24L01P class needs the SPI port, the chips select, chip enable and interrupt line that the physical radio device is connected too.

The radio can be left with the default settings or can be configured via properties. Below are some example properties.

 radio.Features = radio.Features | Feature.AckPayload | Feature.DynamicPayload;
 //Note the number of address bytes must match the configured/default radio.AddressWidth property
 radio.TransmitAddress = new byte[] {0,0,0,0,0};
 radio.Mode = Mode.Receiver;
 radio.Channel = 125;

The class will raise events when data is transmitted or received or errors occur. These events can be hooked, each has an event argument that contains relevant context information.

 _radio.OnDataReceived += RadioOnDataReceived;
 _radio.OnTransmitFailed += RadioOnTransmitFailed;
 _radio.OnTransmitSuccess += RadioOnTransmitSucess;
 _radio.OnDataReceiveFailure += RadioDataReceivedFailure;

 static void RadioDataReceivedFailure(object sender, DataReceiveFailureEventArgs e)
 {
  Debug.Print("OnDataReceiveFailure occured on Pipe: " + e.Pipe);
 }

 static void RadioOnDataReceived(object sender, DataReceivedEventArgs e)
 {
  Debug.Print("RadioOnDataReceived occured on Pipe: " + e.Pipe + " " + e.Payload.Length + "bytes received");
 }

The NRF24L01P supports up to 6 logical radio data pipelines, all sharing some basic settings namely:

  • CRC enabled/disabled (CRC always enabled when Enhanced ShockBurst™ is enabled)
  • CRC encoding scheme
  • RX address width
  • Frequency channel
  • Air data rate
  • LNA gain

The library exposes the data pipelines via an indexer. This allows properties and methods of individual pipes to be accessed.

 radio[Pipe.Pipe0].AutoAcknowledgment = true;
 radio[Pipe.Pipe0].DynamicPayload = true;
 radio[Pipe.Pipe0].Enabled = true;

Acknowledge packets can be queued on a given pipe line using the QueueAcknowledgePacket method.

 radio[Pipe.Pipe0].QueueAcknowledgePacket(new byte[] {0,1,2,3});

In transmitter mode packets can be transmitted using the Transmit method. The Boolean parameter indicates if the packet should be transmitted with an expected acknowledge from the receiver.

 radio.Transmit(new byte[] { 0, 1, 2, 3 }, false);

Finally to power the radio devices RF section up.

    radio.PowerUp = true;

To enable the  radio device, which will set the CE signal to the device, which will active the RX or TX mode of the radio device.

 radio.Enable = true;

Wednesday, 19 March 2014

Home Monitoring System – Version 1.0

Having worked on my home monitoring system on an off for the last number of weeks I have finally gotten to version 1 for the host board and the sensor nodes.

Temperature And Humidity Sensor Node

I completed the development and testing of the wireless temperature and humidity sensor nodes.

WP_20140319_001

This board was installed in an enclosure as shown below. The board was designed to fit snuggly into the enclosure which takes two AAA batteries to power the sensor.

WP_20140319_002WP_20140319_003

The sensor implements a simple channel scanning and handshake protocol which allows it to determine the radio frequency channel the wireless hub is listening for packets. When the channel is found by sending a NodeHello packet to which the wireless hub replies with a NodeHelloAck packet. The NodeHelloAck packet contains configuration data that the node uses to setup it logical RF channel.

Once the handshake has completed the node enters a loop where it sleeps for a period, which is provided as part of the handshake data, wakes up and transmits the latest temperature, humidity and battery voltage readings to the wireless base station.

Wireless Hub

I chose a Netduino Plus 2 as the hardware for the wireless hub. The hardware setup is pretty straight forward. An NRF24L01P radio module is connected to power and the SPI port on the Netduino.

WP_20140319_004

The Netduino implements a simple web server, based on embeddedwebserver, that hosts a set of pages that renders the sensor data from each of the sensors, allows configuration changes to be made and log file viewing. Since the Netduino has limited memory and CPU most of the processing for data rending is offloaded onto the browser. The sensor data page uses a JavaScript graphing component called Rickshaw. The pages are rendered on the client side browser as a single page application using AngularJs as the MVVM framework and Bootstrap to provide a responsive UI that scales to different device screen sizes.

Sensor Data Display

Monitoring

The sensor data is rendered on the main page of the application. The interface allows selection of a number of days of data. Multiple sensor feeds can be rendered, the graphing component supports hoover details when the mouse is over a point on the graph.

Nodes Configuration

Nodes

The nodes configuration page shows active nodes and the node types. The nodes name can be modified.

System Log

log

The logging level is set on the configuration page from 0 to 4, 0 = None 4 = Debug

Configuration

Configuration

The configuration page allows the following to be configured:

  • The radio channel
  • The radio device address
  • The log level
    • None
    • Info
    • Warn
    • Error
    • Debug
  • Update interval, the rate that the sensor will push readings

Future Additions

  • Minor web UI clean up and changes
  • The ability to export sensor data
  • The ability to have a node release its allocated id

I would also like to add some additional sensor types, maybe air quality, water,power etc. Later I would like to use the data gathered to directly control the space heating from the netduino, via a relay node that can be used to advance and retard the heating system based on evaluation of the temperature data. For example on a very cold day fire up the heat at an earlier time than the heating control system would normally.

Monday, 20 January 2014

Home Monitoring System – Sensor Node

Finally the boards that I designed for the home monitoring system arrived from OSH Park. Son now I can get down to building the the boards. The photo below shows the board in the bottom half of the enclosure that I am planning to use.
WP_20140116_003
To ensure that I don't release the blue smoke I decided to build and test the node in a number of steps. For the first step I soldered the components of the power supply and tested the output voltage.
WP_20140116_004
This first step was successful connecting a bench power supply set to 2.8 volts yielded an output of 3.3 volts.
WP_20140116_005
The next step was to solder the remaining capacitors and ICs and resistors. When designing the board I used 0603 for the resistor and capacitor footprints. This was a mistake because they are difficult to hand solder due to the size. Next time I will use the next size up.

The other SMD that was difficult to solder was the LCC8 humidity sensor. In fact I initially soldered it on upside down and had to remove it, in the process of which I destroyed the part. Below is an image of the final board with the debug and ISP header but without the radio module this will be added later.
WP_20140117_004
When I initially attached the ISP I found that it would not connect to the board. The reason for this was that the ISP clock was set to the default of 1Mhz. The ATmega48PA is shipped with internal RC oscillator at 8.0MHz and with the fuse CKDIV8 programmed, resulting in 1.0MHz system clock. Reducing the ISP clock to 1/4 of the CPU frequency resolved the issue.
AVRSettings
When I resolved the connection issue to the device I was able to flash the firmware and start testing the sensor board. The first check was to determine if the ADC voltage monitoring circuit worked. This is where I ran into another problem. I powered the board with a bench power supply @ 2.8 volts. Reading the battery voltage via the ADC resulted in a value of 2.1 volts. After examining the battery sensing circuit it initially looked like the p channel FET was not switching on fully causing a voltage drop of 0.6 volts across the Source to Gate. Checking the Drain voltage measured 2.1 volts which was wrong because it was not switched on, i.e. 0 volts applied.

On a hunch I checked the datasheet of the FET against the footprint on the board. I discovered the PMBFJ177 footprint is different the Gate and Drain are interchanged. I will need to get another J177 FET that matches the board footprint.

Once these issues where resolved I was able to debug the code that reads the humidity and temperature from the CC2D33S sensor using the AVR dragon.

The next step is to add the radio module and figure out a strategy to debug and test the radio module and its code.

Saturday, 4 January 2014

Home Monitoring System – Phase 1

Having spent a great deal of time and effort upgrading my 1970s built home to make it habitable in the winter, yes it was really that bad, and as an added benefit improve its energy efficiency. Now that the improvements have been made I would now like to monitor the effectiveness or lack thereof if that happens to be the case. Unfortunately I have will have no data to compare the data acquired from this proposed system, on the up side I will have data to hopefully make further improvements.

My initial plan is to focus on space heating as this is generally the biggest pain point in older houses.

Goals

  • Capture Temperature and Humidity
    • Temperature and Humidity are related and have an effect on the Thermal Comfort of the living space
  • Small Size Sensors
    • The sensors must be small and inconspicuous as I will be placing a number of them around the house
  • Battery powered
    • AA or AAA batteries, preferably AAA due to the size requirement
  • Efficient Power Usage
    • Aim to be operational for minimum of a year without requiring a battery change

Solution

Sensor

For phase 1 the wireless sensors will communicate with the Control Hub which will log and aggregate the data that the sensor nodes periodically send. The control hub will expose a set of web pages to manage the sensor network devices and view and export data.

Sensor Node

The sensor node is based around an Atmel ATMEGA48PA 8-bit CPU. This was chosen due to the fact that it is a picoPower device which means that it is capable minimising power down to 0.1µA in sleep mode.

The wireless link will use an nRF24L01+ module these are extremely cheap and can be picked up on eBay for 80 cent which is remarkable given the chip itself is about 2-3 euro in single unit prices. This device operates in the 2.4Ghz space and is optimised for low power applications. Consuming sub μA current in power down mode.

To measure humidity and temperature the sensor chosen was the CC2D33S sensor from GE. This sensor has a 3% accuracy and operates from –40 to 125°C. It costs about 6 ~ 8 euro in single unit quantity. It has an I2C bus interface and can operate in a sleep mode where it consumes 0.6 µA (typical) and 750 µA (typical) when operating. It also has a small footprint compared to some of the cheaper Chinese sensors available.

For power management I decided to add a boost regulator based on the 3.3 volt version of the AAT1217 chip. This was chosen due to cost and the fact that it does not need an external Schottky diode which are difficult to find with a low forward voltage drop and reasonable load current.

PowerSupply

The boost regulator will operate down to 0.5 volts ensuring that the sensor node will remain operational as the input voltage drops.

I have also added the option of not installing the boost convertor and its components by placing a shut from VBAT to VCC.

Shunt

To monitor the input voltage to the sensor node I added a simple FET switch switch to a resistor that that the microcontroller will sample when it is performing a sensor update and send the input voltage, temperature and the humidity data.

BatSense

I will use the following enclosure to house the sensor as its neat and tidy. The PCB to fit the chosen enclosure was designed with KiCad and a small batch was ordered through OSH Park. A render of the PCB is shown below.

i

Once the boards arrive I will begin the building and debugging. I will add some follow up posts recording my progress. I think the main risk to the sensor nodes is the radio module. The 2.4 Ghz band is quite congested and the range performance of the 2.4 Ghz modules can be affected by obstacles such as internal doors, floors and walls.

Control Hub

The Control Hub is the next piece of the system, I have not made much progress on the implementation of this yet. I do however have a set of requirements:

  • Expose a simple web interface
    • To view data
    • To manage the sensor nodes, update interval etc.
  • On board storage
    • Should not require external storage for storing reading
  • Expose  a programmatic interface
    • Maybe some kind of restful interface

Sunday, 1 September 2013

Dynamic resource pool with Weak References

Sometimes its necessary to allocate a number of expensive resources at runtime. These resources can be expensive in terms of threads or memory.  They maybe individually expensive, have a large memory footprint, have a high number of threads or cumulatively expensive for example many instances have to be allocated. It may also be the case that the creation of the resource objects is an expensive task in itself.

To address this problem it is usual to implement an object pool. This pattern is one of the creational design patterns, the intent of this pattern is to reuse and share objects that are expensive to create. It can also be put to use to manage objects that encapsulate expensive resources.

One of the implementation constraints of an object pool implementation is the management of the number resources that are allocated by the object pool. The general implementation of an object pool supposes a fixed number of resources that are allocated when the pool is constructed and are destroyed when the object pool is destroyed.

For the specific problem I am trying to solve, fixed resource allocation is too restrictive, I need some elasticity in the pool. I require the pool to shrink and expand base on the number of outstanding requests for objects.

There are a number of options available to implement this elasticity for example
  • A cache configured with sliding window flushing of least recently used resources
  • A background thread that manages last access time and release resources
Both of the implementations above would allow the resource allocation to be elastic. Both have the disadvantage of there response time to clean up of unused resources contained within the pool. This is due to the fact that both will have some periodic interval for clean up. The sliding wind value for the cache and the polling interval for the threaded solution. Tuning an optimal “rate of elasticity” adds to the complexity of the solution. It also means that one needs to tune this rate for different applications that have different resource allocation profiles.

The solution that I have chosen is to allocate resources and maintain references with Weak References inside the resource pool. This allows the pool to respond to the request for resources and also to memory pressure on the system.

Dynamic Resource Pool

First lets define an interface for the resource pool. Using a generic interface allows the implementation of the pool to be abstracted from the implementation of the object pool.

/// <summary>
/// A resource pool that dynamically allocates and releases resources of type T
/// </summary>
/// <typeparam name="T"></typeparam>
public interface IDynamicResourcePool<T> where T : class
{
 /// <summary>
 /// Acquires a resource from the pool.
 /// </summary>
 /// <returns>An instance of a resource from the pool</returns>
 T AcquireResource();

 /// <summary>
 /// Release a resource back to the pool
 /// </summary>
 /// <param name="resource">The resource to release</param>
 void ReleaseResource(T resource);
}

Dissecting the DynamicResourcePool first we look at the local variables and the constructor for the class.

private readonly ConcurrentQueue<WeakReference> _resources;

private readonly PerformanceCounter _rateOfCreation;
private readonly PerformanceCounter _rateOfRelease;
private readonly PerformanceCounter _rateOfAquire;
private readonly PerformanceCounter _totalResources;
private readonly Func<T> _factoryFunc;

/// <summary>
/// Construct an instance of a <see cref="DynamicResourcePool{T}"/>
/// </summary>
/// <param name="resourceFactoryFunc">The factory used to create resources</param>
public DynamicResourcePool(Func<T> resourceFactoryFunc)
{
 _resources = new ConcurrentQueue<WeakReference>();
 _factoryFunc = resourceFactoryFunc;

 if(PerformanceCounterCategory.Exists(CounterMetadata.CategoryName))
 {
  String instanceName = GetType().GetGenericArguments()[0].Name;

  _rateOfCreation = new PerformanceCounter(CounterMetadata.CategoryName, CounterMetadata.CreationCounterName, instanceName, false);
  _rateOfRelease = new PerformanceCounter(CounterMetadata.CategoryName, CounterMetadata.ReleasedCounterName, instanceName, false);
  _rateOfAquire = new PerformanceCounter(CounterMetadata.CategoryName, CounterMetadata.AquiredCounterName, instanceName, false);
  _totalResources = new PerformanceCounter(CounterMetadata.CategoryName, CounterMetadata.TotalCreatedCounterName, instanceName, false);
 }
}

The ConcurrentQueue<WeakReference> is used to store the weak references that contain the allocated resources. There are also a set of performance counters for tracking the performance characteristics of the DynamicResourcePool at runtime. The performance counters will be used later in this post to examine the DynamicResourcePool.

Looking at the AcquireResource operation excluding some code for incrementing and decrementing counters its actually pretty simple. Try dequeue a resource from the resources queue if either a resource cannot be dequeued or the dequeued resource is null, i.e. it had been garbage collected, then create a new resource via the factory. Note: because a queue is used as the resource container the release and acquire of resources are round robin. This behaviour could be made configurable by delegating the internal acquire and release operations to an Action<T> or Func<T> delegate like the factory method.

/// <summary>
/// Acquires a resource from the pool.
/// </summary>
/// <returns>An instance of a resource from the pool</returns>
public T AcquireResource()
{
 IncrementCounter(_rateOfAquire);
 WeakReference weakReference;
 T resource = default(T);

 if(_resources.TryDequeue(out weakReference))
 {
  resource = (T)(weakReference.Target);

  if(resource == null)
  {
   DecrementCounter(_totalResources);
  }
 }

 if(resource == null)
 {
  if(_factory != null)
  {
   IncrementCounter(_totalResources);
   IncrementCounter(_rateOfCreation);
   resource = _factoryFunc();
  }
 }

 return resource;
}

The Release method is really simple. The resource is simply queued back in the resource pool.
/// <summary>
/// Release a resource back to the pool
/// </summary>
/// <param name="resource">The resource to release</param>
/// <exception cref="ArgumentNullException">Thrown when the argument is resource is null</exception>
public void ReleaseResource(T resource)
{
 IncrementCounter(_rateOfRelease);

 if(resource == null)
 {
  throw new ArgumentNullException("resource");
 }

 _resources.Enqueue(new WeakReference(resource));
}

Test Client


To demonstrate the behaviour of the DynamicResourcePool the test client performs the following:
  • Defines a resource type, ByteBuffer
  • Creates a DynamicResourcePool <ByteBuffer>
  • Starts a number of Tasks to allocate and release ByteBuffer resources
  • Forces a garbage collection
  • At each stage reports the memory consumption of the process

After running the test client the following output is displayed.

image

The Memory to be Allocated figure indicates the amount of bytes that the ByteBuffer instances will contain, this is 10Mb each times 20 tasks. The Memory used after Allocation shows the initial processes allocated managed memory plus the memory allocated for the 20 ByteBuffer instances. The test client forces a garbage collection cycle, since there are no tasks running at this point all ByteBuffer instances are collected.

Looking at the performance counters we can see the behaviour of the DynamicResourcePool. First the Total Resources Created counter shows that it starts at zero and rises linearly to 20, which corresponds to the allocation profile of the Tasks.

Total

The Resources Created counter shows that the DynamicResourcePool creates resources initially and then stops when the Total Resources Created reaches 20 as expected.

created

The Resources Acquired counter shows the rate of resources acquired. The Resources Release counter tracks the acquired counter due to the nature of the test client code. The Resources Acquired counter reaches about 200 per second which is as expected as the test code acquires and releases a resource every 100 milliseconds on 20 separate threads.

Acquired

Further Enhancements

  • Allow acquire and release strategy to be configured.
  • Allow the pool to pre allocate resources at construction time

Source Code


Note: you will need to launch either VS or the test client as administrator as it registers performance counters.
The code is available here: GitHub DumpingCoreMemory.ResoucePooling

Wednesday, 31 July 2013

C++/CLI Asynchronous events using EventHandler<T>

While developing some code to expose a native C++ library as a managed component to be used in a C# component. I found that I needed to raise an event asynchronously from the C++/CLI class. Since I have a preference to use EventHandler and EventHandler<TEventArgs> delegates for exposing events rather than define the delegate and the event separately.

So naively, as its been a while since I wrote C++ and my first time writing C++/CLI, I proceeded to simply define an event as shown in the following example snippet:
ref class EventSource
{
 public:
  event EventHandler^ SyncEvent;
}

And invoke it as in the following example snippet:

void EventSource::RaiseSyncEvent(void)
{
 SyncEvent->BeginInvoke(this, EventArgs::Empty, gcnew AsyncCallback(this, &EventSource::Callback), nullptr);
}
Two which I received the following compiler error:
Error    1    error C3918: usage requires 'EventSource::SyncEvent' to be a data member

In the case above this is caused by the fact that you cannot access the backing field for the event delegate. If we decompile the code with ILSpy we can see that the compiler generates the following C# code:

image

This is due to the fact that the event syntax used to define the SyncEvent is called trivial event. A trivial event is similar to a trivial property where by the compiler provides the backing store field and the assessor methods.

The C++/CLI compiler also provides a raise_xxxxxxx method as shown below, which is kind of neat as the C# compiler requires that you write the equivalent code to insure thread safety when accessing the delegate.

image

To get access to the underlying event delegate the nontrivial event syntax must be used. This requires the definition of the assessor methods. The add and remove are mandatory and the raise method is optional.

Here is where I discovered another small problem. There are no examples of how to use EventHandler and EventHandler<TEventArgs> delegates on the Microsoft web site. All of the examples use the explicit delegate and event definition syntax.

To define a non trivial event first define the private field/property.
ref class EventSource
{
 private:
  EventHandler^ m_asyncEvent;

Then define the explicit add and remove methods.
event EventHandler^ AsyncEvent
{
 void add(EventHandler^ eventHandler) 
 {
  m_asyncEvent += eventHandler;
 }

 void remove(EventHandler^ eventHandler) 
 {
  m_asyncEvent -= eventHandler;
 }
}

You can now invoke the event asynchronously via BeginInvoke, note you must check for null as the compiler no longer generates the nice raise method.
void EventSource::RaiseAsyncEvent(void)
{
 if(m_asyncEvent != nullptr)
 {
  m_asyncEvent->BeginInvoke(this, EventArgs::Empty, gcnew AsyncCallback(this, &EventSource::Callback), nullptr);
 }
}

Note that a call-back must provided to clean up the IAsyncResult instance by calling the EndInvoke method, see here for further reference.
void EventSource::Callback(IAsyncResult^ ar)
{
 Console::WriteLine("EventSource::Callback invoked on Thread Id: {0}", Thread::CurrentThread->ManagedThreadId);
 AsyncResult^ result = (AsyncResult^) ar;
    EventHandler^ caller = (EventHandler^) result->AsyncDelegate;
 caller->EndInvoke(ar);
}


The code is available here: GitHub AsyncEvent

Wednesday, 24 July 2013

A Bounded Task Dispatcher

During a recent implementation I had to resolve some information from a database in response to a network event. These network events are delivered in a serialised order via a custom protocol. In order to decouple the processing of event messages from the query of the database, which is an order of magnitude slower than the event rate, it was necessary to dispatch the event processing onto a separate thread. This would allow the events to be processed in parallel. A secondary requirement was to limit the number of parallel threads to some upper bound.

To execute event processing on a separate thread there are a number of options:
  1. Create a Thread explicitly and manage its lifecycle
  2. Use the ThreadPool to dispatch the request processing
  3. Use a BackGroundWorker to dispatch request processing
  4. Create a Task and manage its lifecycle
There are a number of disadvantages to the options 1 and 2, which basically boil down to the amount of plumbing code required to manage and synchronise thread execution and lifecycle. For example handling exceptions, return data etc.

Option 3 is not really a viable option, it is on the list just for completeness, I would not use, or recommend, the BackGroundWorker for dispatching requests for a backend component as it is primarily a UI component.

The .Net framework 4.0 introduced the System.Threading.Tasks namespace which contains a number of classes and types that simplify the work of writing concurrent and asynchronous code. The Task class is the type from System.Threading.Tasks that the bounded dispatcher is based on.

The Task dispatcher code walk through

The TaskDispatcher type encapsulates the management of the dispatched tasks. Looking at the constructor we can see it takes an argument that specifies the maximum number of tasks that can be dispatched in parallel.
/// <summary>
/// The <see cref="TaskDispatcher"/> constructor
/// </summary>
/// <param name="maxTasks">The maximum number of tasks that can be dispatched before the call to <seealso cref="Dispatch"/> blocks</param>
public TaskDispatcher(Int32 maxTasks)
{
 _executingTasks = new List<Task>();
 _tasks = new Semaphore(maxTasks, maxTasks);
 _tokenSource = new CancellationTokenSource();
}

The _executingTasks is a list that references the executing tasks. The _tasks Semaphore is used to bound the upper limit of Tasks that can be dispatched by the TaskDispatcher. The _tokenSource is a CancellationToken that is use to cancel executing tasks.

Dispatching Tasks

/// <summary>
/// Dispatches an <see cref="Action"/> for execution. 
/// </summary>
/// <param name="action">The <see cref="Action"/> to dispatch</param>
/// <param name="completionCallback">The callback action to invoke when the task completes</param>
/// <param name="dispatchTimeout">The <see cref="TimeSpan"/> to wait for a task to be dispatched</param>
/// <exception cref="TimeoutException">An exception thrown when the <see cref="action"/> cannot be dispatched within the <paramref name="dispatchTimeout"/> </exception>
public void Dispatch(Action<CancellationToken> action, Action<Task,Exception> completionCallback, TimeSpan dispatchTimeout)
{
 if (_tasks.WaitOne(dispatchTimeout))
 {
  lock (_executingTasks)
  {
   var task = new Task(() => action(_tokenSource.Token));
   task.ContinueWith(t => Completion(t, completionCallback));
   task.Start();

   _executingTasks.Add(task);
  }
 }
 else
 {
  throw new TimeoutException(String.Format("Unable to dispatch action within timeout {0}", dispatchTimeout));
 }
}
To dispatch a task the Dispatch method is called, passing a parameter action of type Action<CancellationToken> and a parameter completionCallback of type Action<Task, Exception> delegate which is invoked when the dispatched action delegate completes.

The thread invoking the Dispatch method attempts to enter the _tasks semaphore by calling the WaitOne method. If the semaphore is not signalled within the timeout period then an exception is thrown to indicate that a Task cannot be dispatched.

If the thread can enter the _tasks semaphore a Task is created passing a CancellationToken to the constructor, the CancellationToken is used to control the executing Tasks cancellation. The Task is added to the list of executing tasks, and the calling thread returns.

If there are multiple competing threads trying to enter the _tasks semaphore there is no guaranteed order as to which competing thread will be signalled. This is due to the behaviour of the semaphore. Also it is possible that to threads enter the Semaphore, thread A followed by thread B. Due to pre-emptive scheduling thread B may acquire the lock on the _executingTasks before thread A.

On Completion


/// <summary>
/// The completion callback thats called when a dispatch task was completed
/// </summary>
/// <param name="completedTask">The <see cref="Task"/> that completed</param>
/// <param name="completionCallback">The callback that is invoked when the dispatched <see cref="Task"/> executes to completion</param>
private void Completion(Task completedTask, Action<Task,Exception> completionCallback)
{
 _tasks.Release();

 lock (_executingTasks)
 {
  _executingTasks.Remove(completedTask);
 }

 completionCallback(completedTask, completedTask.Exception);
}
On completion of an instance of a Task the private method Completion is called. This method releases the _tasks semaphore and removes the Task from the _executingTasks list. It then invokes the completionCallback delegate which was provided to the completedTask when it was constructed. If there is an exception associated with the completed task it is passed to the completion call-back.

Cancelling Tasks

/// <summary>
/// Cancel all executing <see cref="Task"/>
/// </summary>
public void CancelAll()
{
 _tokenSource.Cancel();

 Task.WaitAll(_executingTasks.ToArray());
}
To cancel executing tasks the CancelAll method of the task dispatcher is invoked. This method sets the _tokenSource to cancelled. This sets the isCancellationRequested property to true. Dispatched actions should check this property for example:
static void CancellableTask(CancellationToken cancellationToken)
{
 for (int i = 0; i < 100000; i++)
 {
  // Simulating work.
  Thread.SpinWait(5000000);

  if (cancellationToken.IsCancellationRequested)
  {
   // Perform cleanup if necessary.
   //...
   // Terminate the operation.
   break;
  }
 }
}

Note: An errant task method that does not honour the CancellationToken will block the call to CancelAll method. This behaviour could of the CancelAll method could be modified by causing the Task.WaitAll to wait a period of time and then terminate the tasks that did not terminate with the timeout. This would be drastic and should be avoided, if it is possible modify the behaviour of the dispatched methods to hour honour the CancellationToken

Further enhancements


The code presented here is the basic functionality of a bounded task dispatcher some further improvements could be made. For example:

  • Make the entire Dispatch class generic so that the action parameter type can be specified for example as a Func delegate so a return value can be passed back from the dispatched method.

  • Add methods to allow individual tasks to be cancelled.
The code is available here: GitHub DumpingCoreMemory.Threading

Thursday, 20 June 2013

Windows Azure SDK 1.7 + Windows Server App Fabric 1.1 Install Error

While setting up my development machine for some proof of concept development for migration of an existing application to Windows Azure, I experienced an issue with installing Windows Azure SDK 1.7, released in June, on the machine that had Windows Server AppFabric 1.1 installed previously.
MSI (s) (58:BC) [12:08:37:660]: Executing op: ActionStart(Name=RollbackRegisterEventManifest,,)
MSI (s) (58:BC) [12:08:37:662]: Executing op: CustomActionSchedule(Action=RollbackRegisterEventManifest,ActionType=3393,Source=BinaryData,Target=CAQuietExec,CustomActionData="wevtutil.exe" um "C:\Program Files\Microsoft SDKs\Windows Azure\.NET SDK\2012-06\bin\plugins\Caching\Microsoft.ApplicationServer.Caching.EventDefinitions.man")
MSI (s) (58:BC) [12:08:37:664]: Executing op: ActionStart(Name=RegisterEventManifest,,)
MSI (s) (58:BC) [12:08:37:666]: Executing op: CustomActionSchedule(Action=RegisterEventManifest,ActionType=3073,Source=BinaryData,Target=CAQuietExec,CustomActionData="wevtutil.exe" im "C:\Program Files\Microsoft SDKs\Windows Azure\.NET SDK\2012-06\bin\plugins\Caching\Microsoft.ApplicationServer.Caching.EventDefinitions.man")
MSI (s) (58:50) [12:08:37:705]: Invoking remote custom action. DLL: C:\Windows\Installer\MSI4266.tmp, Entrypoint: CAQuietExec
CAQuietExec:  Provider Microsoft-Windows Server AppFabric Caching is already installed with GUID {a77dcf21-545f-4191-b3d0-c396cf2683f2}.
CAQuietExec:  Configuration error.
CAQuietExec:  Error 0x80073aa2: Command line returned an error.
CAQuietExec:  Error 0x80073aa2: CAQuietExec Failed
CustomAction RegisterEventManifest returned actual error code 1603 (note this may not be 100% accurate if translation happened inside sandbox)
Action ended 12:08:37: InstallFinalize. Return value 3.

The workaround is to remove the AppFabric Cache component first and then install the Windows Azure SDK 1.7, there is some more information here: http://social.msdn.microsoft.com/Forums/en-US/windowsazuredevelopment/thread/cafcc159-578a-469f-b1d5-59a4b9c6b5c4/

Friday, 1 February 2013

A small ARM race

I have been on a quest lately to find a computer that meets the following criteria:

  • Cheap enough to let the kids have it
  • I don't really care if the kids break it
  • I would like them to maybe learn something about computers, Don’t want app junkies
  • I’m old school and want the kids to learn to use a keyboard and a mouse, not mash their paws on a screen
  • I can reuse some old hardware, keyboard + mouse + monitor
  • Low power consumption

The initial logical answer is the Raspberry PI, yes its cheap but, I’m of the opinion based on discussion on the web that it is a bit under powered as a computer and is more suited to embedded control projects then as a low cost PC like device.

Next up on the list is the Beagleboard-xm it has a bit “power” than the Raspberry PI but it is still considered an embedded board. Having the opportunity to play around with a Beagleboard-xm I was impressed buy its low power consumption, about 750mA @ 5 volts which works out at about 3.75 watts, that was running Ã…ngström while playing 720p video. Unfortunately that is all this board is capable of due to the video processor. But the gnome UI was smooth and use able.

I the installed Ubuntu 12.10 on the micro SD card, which is what most of these small arm board boot from, the result was less that impressive. The response from the UI was pretty slow.

Next on the list is the Pandaboard ES which is a step above the Beagleboard-xm, it has 1GB of ram and a 1.2 Ghz processor and is capable of 1080p. This looks like a pretty capable board but it is more expensive than the Beagleboard-xm. Unfortunately I’ve not had the chance to play with one yet but its on the list of contenders.

I recently found a new entry into the small low powered ARMBrix Zero from a Korean company.

Unfortunately the first batch has sold out. Hopefully there will be more. This is a pretty powerful board it has a Samsung Exynos 5250 dual core ARM Cortex-A15 which is a pretty powerful processor on a board that has 2GB of ram, HDMI, USB 3.0 and a SATA port, 1080p video decoding all for $145 + shipping.

The catch is that there was only one pre order batch available to order which was for an engineering evaluation run. The people behind the board are in the process of testing the design. I for one am eagerly awaiting the next run.

Only problem is I might not let the kids have it :>

Tuesday, 29 January 2013

IASA Ireland Chapter

Attended the IASA IT Architects – 2013 Kick Off Event on Thursday 24th. Wasn't really too sure what to expect but was pleasantly surprised. The presentation covered the usual who and what is IASA, information about the Irish chapter, training and certification.

The really big news is that the Irish chapter is to become the IT architecture network within ICS, ICS and IASA have signed a partnership agreement with ICS.

Expect to hear more from March onwards as the details are worked out.

Custom WCF UserNamePasswordValidator Performance Impact

Recently I have had to perform some debug/analysis on an unusual case of clients receiving timeouts on a critical WCF service in a production environment. I use the term “unusual” to describe the timeouts due to the nature in which these timeouts occur combined with the operation behaviour of the service when they are occurring. That and the timeouts are extremely severe, every client experiences timeouts, in my experience with WCF is not an expected operational behaviour of the WCF stack. Under normal high load scenarios a percentage of clients will experience timeouts or receive the expected Server To Busy fault when the WCF service has breached its configured throttle values.
In this specific case knowing the operation capabilities of the WCF service in question I knew that the amount of load on the server although high was well within the capacity of the service in question. Nor was the load significant enough to breach the configured service throttles. I eventually got to the bottom of the issue through debug and crash dump analysis. It was an unexpected/undocumented behaviour of the WCF stack coupled/influenced by a specific behaviour of a custom UserNamePasswordValidator used by the WCF service.
I thought it would be worth describing the problem in more detail in the hope it might help others who experience WCF Service performance issues, that done seem to "make sense", giving one additional diagnostic check to ad to the toolbox.

Symptoms

The symptoms of the service outage are as follows:
  • A high percentage of clients, > 90%, receive timeouts or Server To Busy exceptions
  • The Instances service performance Counter is at or close to the the configured or defaulted ServiceThrottlingElement.MaxConcurrentInstances value
  • The Calls Per Second Rate service performance counter is low or at 0 for periods of time
  • If the service is deployed in an IIS app pool the ASP.NET Application Performance Counter  Pipeline Instance Count will be at or close to its configured or defaulted value
  • The Security Validation And Authentication Failures performance counter can be non zero
  • The service appears to be deadlocked or being starved of requests, the service is not writing log files or updating database etc. but clients experience timeouts or very slow reponses
  • Very low CPU utilisation by the process in question


Cause

After generating a process memory dump, from the WCF Service. After examining all of the threads stacks by executing the EEStack command it was clearly evident that most of the threads in the process where blocked on the unmanaged windows API method GetQueuedCompletionStatus which is a blocking I/O call. One call was blocked on the Validate method of the UserNamePasswordValidator.
It transpires that the the Validate method of the custom UserNamePasswordValidator used by the WCF service, talks to a proprietary back office system to validate a clients username and password. To prevent a client from brute forcing a users password it will delay the username/password validation response for 5 seconds after the nth unsuccessful attempt. This has very serious consequences for the throughput of the WCF service.


Demonstration Code And Results

To demonstrate this problem I have put together a simple demo base on one of the WCF sample applications. It is the calculator application that implements a simple custom UserNamePasswordValidator. The code itself is not really the interesting part and is pretty trivial, the intent is to demonstrate the symptoms.


Setup

Run the Setup.Bat file in the .\UserNamePasswordValidator\CS folder. Note you should run this from a VS2010 command prompt with administrative privileges. As it creates a test certificate and grants access to the private key for encryption/signing the message credentials.


Clean-up

Run the CleanUp.bat file in the .\UserNamePasswordValidator\CS folder. Note you should run this from a VS2010 command prompt with administrative privileges. AS it deletes the test certificate created by setup.bat
Open the solution in VS2010 running as a administrator as the code attempts to register a http.sys listener on port 8001.
There are a number of application settings that can be used to modify the behaviour of the client and service code.
In the LoadTestClient there are the following settings:
<applicationSettings>
 <LoadTestClient.Properties.Settings>
   <!-- The number of tasks to create with valid passwords -->
   <setting name="NumberTasksValidPassword" serializeAs="String">
    <value>10</value>
   </setting>
   <!-- The number of tasks to create with invalid passwords -->
   <setting name="NumberTasksInvalidPassword" serializeAs="String">
    <value>2</value>
   </setting>
 </LoadTestClient.Properties.Settings>
</applicationSettings>

In the service there is one setting to configure the sleep time for invalid requests:
<applicationSettings>
 <service.Properties.Settings>
  <!-- The sleep time for a request with an invalid password -->
  <setting name="InvalidCredentialSleep" serializeAs="String">
   <value>1000</value>
  </setting>
 </service.Properties.Settings>
</applicationSettings>

Test Runs


To demonstrate the behaviour I have put together a few test cases, that vary each of the parameters of the test and show the results.

10 Tasks valid credentials , 0 Tasks invalid credentials

imageimage

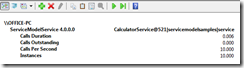
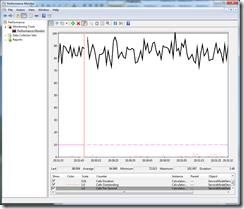
Form the graphs above we can see 10 service instances performing approximately 85 calls/second. The calls outstanding counter averages < 1. This is normal operation of the service.

10 Tasks valid credentials , 2 Tasks invalid credentials, Invalid Credential sleep time 1 sec


imageimage

As we can see can see from the above, the results are relatively similar.

10 Tasks valid credentials , 3 Tasks invalid credentials, Invalid Credential sleep time 1 sec

imageimage

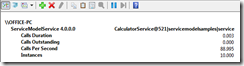
As we can see from the above we have reached a tipping point. When the number of clients making invalid requests increases to 3, we can see initially the service respond times and calls/second are ok. When the three client tasks with invalid passwords start the throughput of the service is severely throttled to approximately 10 calls/sec. I would also draw your attention to the Calls Duration metric which is close to the other two runs.

10 Tasks valid credentials , 2 Tasks invalid credentials, Invalid Credential sleep time 5 sec


imageimage

When the number of clients making invalid requests is set to 2 but the sleep time is increased to 5 seconds we see a very erratic calls/second profile. Again the Calls Duration metric at the service level is in line with the other tests, but if measured from the client we would see a higher Calls Duration. The Calls Outstanding metric is also not zero more often than in the previous tests.

10 Tasks valid credentials , 4 Tasks invalid credentials, Invalid Credential sleep time 1 sec


image

When the number of clients making invalid requests is set to 4 with a sleep time of 1 seconds, we can see initially the service respond times and calls/second are ok. When the  When the 4 client tasks with invalid passwords start the calls/second profile of the service is very erratic. Again the Calls Duration metric at the service level is in line with the other tests.

In a real world environment it is clear that you will not see such clear patterns to the calls/second metric. It is more likely that the service will in fact not process any requests if the client invalid call pattern is more random and at a higher volume.

Crash Dump Analysis


If we take a crash dump of the WCF Service process while it is in the “Deadlocked/Blocked” state we can examine the processes threads.

0:000> !threads
ThreadCount:      12
UnstartedThread:  0
BackgroundThread: 11
PendingThread:    0
DeadThread:       0
Hosted Runtime:   no
                                       PreEmptive                                                   Lock
   ID  OSID        ThreadOBJ     State GC       GC Alloc Context                  Domain           Count APT Exception
0    1  16d0 0000000000205eb0      a020 Enabled  0000000000000000:0000000000000000 00000000001f9780     1 MTA
2    2  184c 000000000020c1f0      b220 Enabled  0000000000000000:0000000000000000 00000000001f9780     0 MTA (Finalizer)
6    a  1708 000000001b9df9d0   a009220 Enabled  0000000000000000:0000000000000000 00000000001f9780     0 MTA (Threadpool Completion Port)
8    6  1ae8 000000001b927570   a009220 Enabled  0000000000000000:0000000000000000 00000000001f9780     0 MTA (Threadpool Completion Port)
9    4  19fc 000000001b926cf0   8009220 Enabled  0000000000000000:0000000000000000 00000000001f9780     0 MTA (Threadpool Completion Port)
10    8  1958 000000001b9e1e40   8009220 Enabled  0000000000000000:0000000000000000 00000000001f9780     0 MTA (Threadpool Completion Port)
11    b   e84 000000001b9e6c60   8009220 Enabled  00000000033bb8c0:00000000033bd178 00000000001f9780     0 MTA (Threadpool Completion Port)13    c   e18 000000001b9f2260   8009220 Enabled  0000000000000000:0000000000000000 00000000001f9780     0 MTA (Threadpool Completion Port)
14    5  1a58 000000001b90c4a0   8009220 Enabled  0000000000000000:0000000000000000 00000000001f9780     0 MTA (Threadpool Completion Port)
17    9   728 000000001af1f7c0   8009220 Enabled  0000000000000000:0000000000000000 00000000001f9780     0 MTA (Threadpool Completion Port)
18    d  1aec 000000001af1ef40   8009220 Enabled  0000000000000000:0000000000000000 00000000001f9780     0 MTA (Threadpool Completion Port)
19    3  1be0 000000001aed7e00   8009220 Enabled  0000000000000000:0000000000000000 00000000001f9780     0 MTA (Threadpool Completion Port)


We can see that all of the threads are running but the Exception column which lists the last thrown exception (if any) for the thread, shows (ThreadPool Completion Port). We can exclude a few of the threads from inspection, for example thread 0 is the thread executing the Microsoft.ServiceModel.Samples.CalculatorService.Main() method. Thread 2 is the CLR Finalizer thread.

If we look at a few of the other threads call stacks, shortened for brevity, we see the following:

---------------------------------------------
Thread  17
Current frame: ntdll!NtRemoveIoCompletion+0xa
Child-SP         RetAddr          Caller, Callee
000000001d5deb40 000007fefdf616ad KERNELBASE!GetQueuedCompletionStatus+0x39, calling ntdll!ZwRemoveIoCompletion
000000001d5deb50 000007fef4d46b1c clr!GCHolderBase<1,0,0,1>::Pop+0x2c, calling clr!Thread::EnablePreemptiveGC
000000001d5deb80 000007fef4e309ff clr!Thread::InternalReset+0x140, calling clr!Thread::SetBackground
000000001d5deba0 00000000777aa4e1 kernel32!GetQueuedCompletionStatusStub+0x11, calling kernel32!GetQueuedCompletionStatus
000000001d5debb0 000007fef4d7dd49 clr!Thread::LeaveRuntime+0x9, calling clr!Thread::LeaveRuntimeNoThrow
000000001d5debe0 000007fef4f1eb2f clr!ThreadpoolMgr::CompletionPortThreadStart+0x113, calling kernel32!GetQueuedCompletionStatusStub
000000001d5dec50 000007fef4d46a14 clr!operator delete+0x45, calling kernel32!GetLastErrorStub
---------------------------------------------
Thread  18
Current frame: ntdll!NtRemoveIoCompletion+0xa
Child-SP         RetAddr          Caller, Callee
000000001ce7ec10 000007fefdf616ad KERNELBASE!GetQueuedCompletionStatus+0x39, calling ntdll!ZwRemoveIoCompletion
000000001ce7ec20 000007fef4d46b1c clr!GCHolderBase<1,0,0,1>::Pop+0x2c, calling clr!Thread::EnablePreemptiveGC
000000001ce7ec50 000007fef4e309ff clr!Thread::InternalReset+0x140, calling clr!Thread::SetBackground
000000001ce7ec70 00000000777aa4e1 kernel32!GetQueuedCompletionStatusStub+0x11, calling kernel32!GetQueuedCompletionStatus
000000001ce7ec80 000007fef4d7dd49 clr!Thread::LeaveRuntime+0x9, calling clr!Thread::LeaveRuntimeNoThrow
000000001ce7ecb0 000007fef4f1eb2f clr!ThreadpoolMgr::CompletionPortThreadStart+0x113, calling kernel32!GetQueuedCompletionStatusStub
000000001ce7ed20 000007fef4d46a14 clr!operator delete+0x45, calling kernel32!GetLastErrorStub


As mentioned earlier GetQueuedCompletionStatus is a blocking operation.

Looking at Thread 8 we can see that it is the only thread executing the Validate method of the CustomUsernameValidator.

Thread   8
Current frame: ntdll!NtDelayExecution+0xa
Child-SP         RetAddr          Caller, Callee
000000001c4cd200 000007fefdf61203 KERNELBASE!SleepEx+0xab, calling ntdll!ZwDelayExecution
000000001c4cd220 000007fee14f2f9a (MethodDesc 000007fee148ffb0 +0x4a System.Xml.XmlBufferReader.GetString(Int32, Int32)), calling (MethodDesc 000007fef39e5540 +0 System.String.CtorCharArrayStartLength(Char[], Int32, Int32))
000000001c4cd270 000007fefdf6358b KERNELBASE!SleepEx+0x12d, calling ntdll!RtlActivateActivationContextUnsafeFast
000000001c4cd2a0 000007fef4d76455 clr!EESleepEx+0x22, calling kernel32!SleepExStub
000000001c4cd2d0 000007fef4f33fba clr!Thread::UserSleep+0x97
000000001c4cd310 000007fee14e95bf (MethodDesc 000007fee1470360 +0x2f System.Xml.XmlBaseReader.get_Value()), calling clr!JIT_WriteBarrier_Fast
000000001c4cd320 000007fef4f3410c clr!ThreadNative::Sleep+0x100, calling clr!Thread::UserSleep
000000001c4cd3d0 000007fee166fca5 (MethodDesc 000007fee148f5e8 +0x85 System.Xml.XmlBaseReader.ReadElementString())
000000001c4cd3e0 000007fee167ed39 (MethodDesc 000007fee148d818 +0x19 System.Xml.XmlDictionaryReader.ReadStartElement(System.Xml.XmlDictionaryString, System.Xml.XmlDictionaryString))
000000001c4cd3e8 000007ff00160be6 (MethodDesc 000007ff001b4f98 +0x116 Microsoft.ServiceModel.Samples.CalculatorService+CustomUserNameValidator.Validate(System.String, System.String)), calling (MethodDesc 000007fef3a5cd98 +0 System.Threading.Thread.Sleep(Int32))


Summary


In my opinion it is evident from the test results and the stack trace analysis presented in this post that there is some inherent "queuing/pipelining" in the processing of messages with credentials. Whether or not this is due to the fact that a custom UserNamePasswordValidator is being used is unclear. It is also evident that this “pipeline” is sensitive to execution latency of the Validate method of the UserNamePasswordValidator, possibly as a side effect of being a shallow queue.

Either a number of requests of moderate latency or a smaller number of requests with high latency can have a impact on the overall performance of the service. It is therefore something to be aware of when implementing custom UserNamePasswordValidator types that perform credential validation that may be subject to non trivial execution latency either due to I/O or CPU.

In my opinion this behaviour could be exploited to create an effective DOS attack, as the attacker does not have to create a huge request load to affect the WCF services performance. In the specific case that I discovered in the production environment I modified the code to mitigate the problem while remaining secure.